|
The Information Services (IS) department is endeavouring to make the lives of our colleagues as easy as possible during this period. Find below details on how to access key services when Working From Home on Blue Cross devices.
Service DeskThe Service Desk will remain open as normal (Mon to Fri 0830 - 1730) during this period.
You can either call us on 0300 790 9906 or e-mail us at servicedesk@bluecross.org.uk. |
Accessing Emails from Home (Webmail)
All of our colleagues with a Microsoft 365 (M365) account have the ability, if they so choose, to access their work e-mails from home using their own PC by following the steps below. If working from home is a regular activity, then you should request the equipment you require from the IS Service Desk.
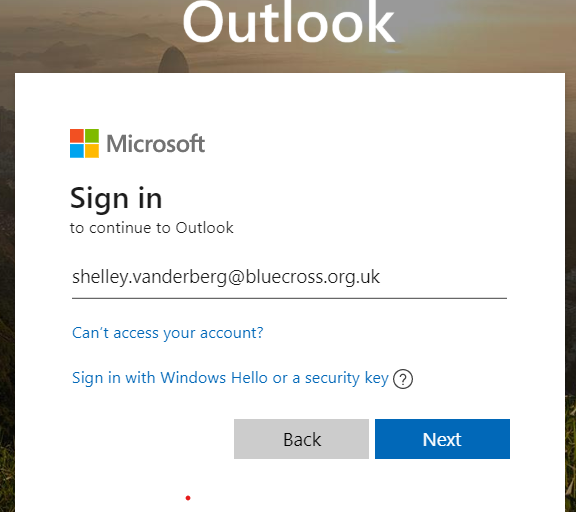
1) Head on over to this web-site: http://outlook.office.com/
2) Enter your full Blue Cross e-mail address (e.g. Joe.Bloggs@bluecross.org.uk) as your username. Press the "Next" button.
1) Head on over to this web-site: http://outlook.office.com/
2) Enter your full Blue Cross e-mail address (e.g. Joe.Bloggs@bluecross.org.uk) as your username. Press the "Next" button.
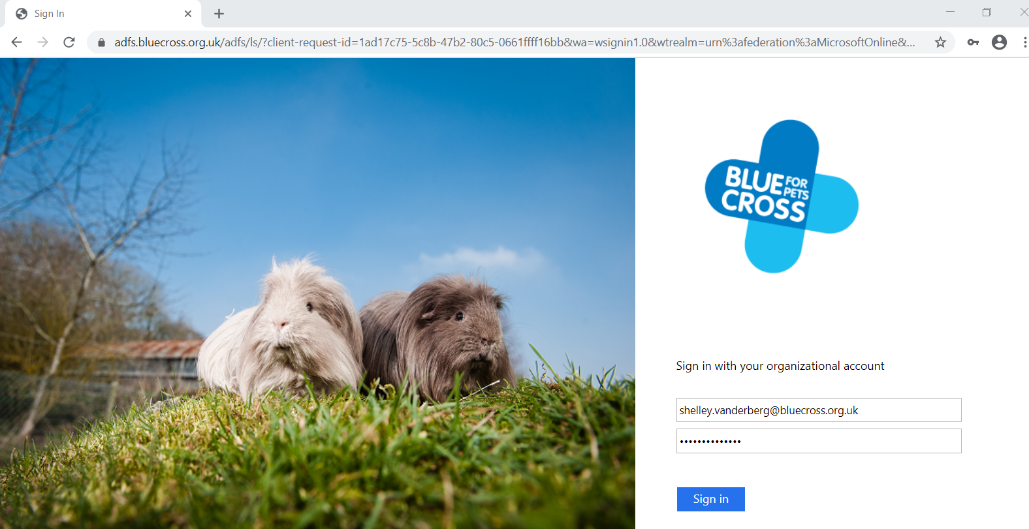
3) On the next screen, please enter your Blue Cross e-mail again and password (the same password that you use at work to logon to Windows).
Press the Sign In button.
Press the Sign In button.
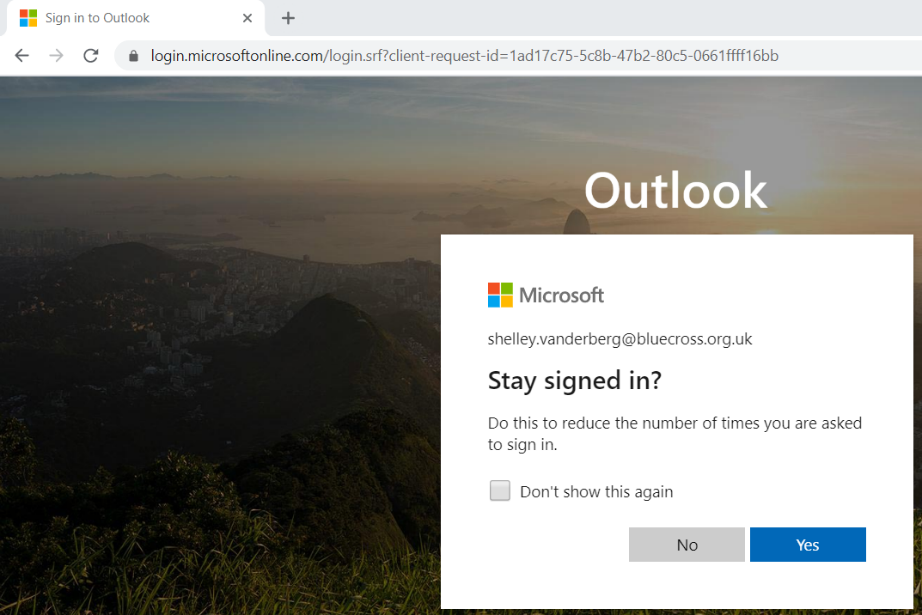
4) Upon logging in, you may be asked if you wish to stay signed in. Please tick "Don't show this again" and then press the "Yes" button.
Accessing Another Mailbox via Webmail
Note: It is a prerequisite that you already have access to the mailbox being added.
Please follow the steps outlined under the heading Accessing Emails from Home (Webmail) to log into your webmail, then follow the steps below to add the additional mailbox.
1) Click on top right icon, which will either be your profile picture or initials (if you haven't uploaded a picture to O365).
2) From the menu, select Open another mailbox.
3) In the pop-up box that appears, type in the name of the mailbox you require and then click Open.
1) Click on top right icon, which will either be your profile picture or initials (if you haven't uploaded a picture to O365).
2) From the menu, select Open another mailbox.
3) In the pop-up box that appears, type in the name of the mailbox you require and then click Open.
Accessing Pawtal (M365) from Home
All Blue Cross colleagues with an O365 account have the ability to access Pawtal (and some other O365 features) using their own personal devices by following the steps below.
1) Head on over to this web-site: bluecross975.sharepoint.com/
2) Enter your full Blue Cross e-mail address (i.e. Joe.Bloggs@bluecross.org.uk) as your username.
3) Enter your Blue Cross password (the same password that you use at work to logon to Windows).
4) Upon logging in, if you're asked for your timezone, please select GMT London, Dublin, Lisbon.
Accessing Merlin from Home
Our colleagues working in Clinical can access Merlin using their own personal devices by following the steps below. NOTE: You must use the CHROME browser.
1) Head on over to this web-site: https://bluecross-pms.vetspace.cloud/
2) Enter your Merlin username.
3) Enter your Merlin password.
4) Please select the device profile that you would normally use whilst at work.
NOTE: any features related to printing and downloading documents should not be used at home.
Accessing MyHub and other Services from Home
Please follow the steps outlined under the heading above Accessing Pawtal (O365) from Home. You'll note that when you reach the homepage of Pawtal, you'll find links to many useful resources such as MyHub under the heading of Important Links. Alternatively, please find direct links to these resources, which you should be able to access from home (using the appropriate credentials).
Setting up Meetings using Teams
As an alternative to face-to-face meetings, you can also conduct video meetings via Teams.
Once a date and time has been agreed for the meeting, you will need to create a link. This can be done via Outlook. In your Outlook calendar, you will need to select the Teams icon.
Once a date and time has been agreed for the meeting, you will need to create a link. This can be done via Outlook. In your Outlook calendar, you will need to select the Teams icon.
2) This will open a new window and will display the link to join the meeting.
2) This will open a new window and will display the link to join the meeting.
3) Copy and paste all the link into an email and send to the other party. Also, pop it into your diary. On the day of the meeting, you will need to select the link to join the meeting (as would the other party). Prior to the meeting, we strongly recommend that you carry out a test call with each attendee to be sure you are able to connect and avoid any technical issues. It is important to let the attendees know that they need to use the same device for the test call that they will be using for the actual meeting. If attendees need to install Skype for Business then please review the following steps.
4) All attendees will need to install Teams on their device (i.e laptop, desktop or mobile device).
4) All attendees will need to install Teams on their device (i.e laptop, desktop or mobile device).
5) When Teams has been downloaded and installed, attendees need to select the link to join the meeting, which you had sent in the email invitation.
6) This will then open Teams where they can choose to click on ‘Join as Guest’.
Forwarding Calls from your Desk Phone
If you have a physical handset on your desk, you can easily forward calls to another number by following the steps below.
1) From the main menu/screen of the phone, you will note that there is a button named "Forwarding".
2) After pressing the "Forwarding" button, please enter the telephone number that you wish to forward your calls to.
1) From the main menu/screen of the phone, you will note that there is a button named "Forwarding".
2) After pressing the "Forwarding" button, please enter the telephone number that you wish to forward your calls to.
Installing Fortigate/FortiClient VPN
Working from home, you can connect to the Blue Cross network resources by using a VPN client on a Blue Cross supplied device. This method extends the Blue Cross network out across the internet and into your home but before you remove any Desktops PCs from the Blue Cross environments you must complete the following steps. These steps will not work if your PC is already in your home, this will only work at a Blue Cross place of work connected to the Blue Cross network.
The following steps will allow you to install the FortiGate VPN client on your machine to allow you to work from home and connect to Blue Cross resources.
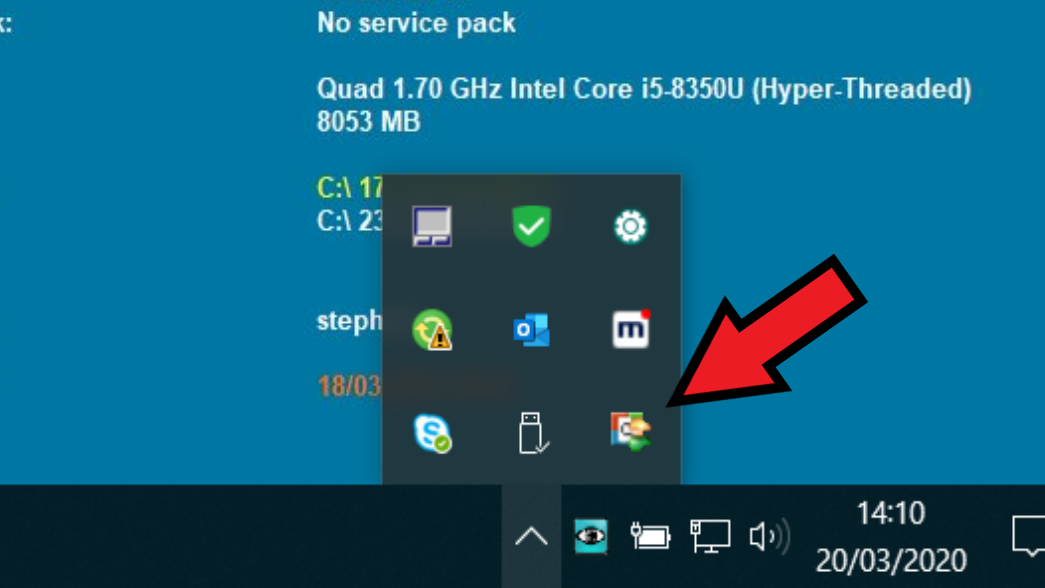
Go to the bottom right hand corner of the screen and click on the white up arrow in the task bar. This will display show hidden icons, left click once.
The follow should be displayed:
The following steps will allow you to install the FortiGate VPN client on your machine to allow you to work from home and connect to Blue Cross resources.
Go to the bottom right hand corner of the screen and click on the white up arrow in the task bar. This will display show hidden icons, left click once.
The follow should be displayed:
Right click on the small multi coloured icon with the person symbol:
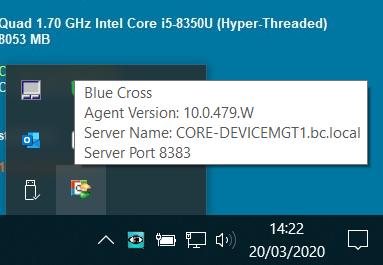
The following pop up will be displayed:
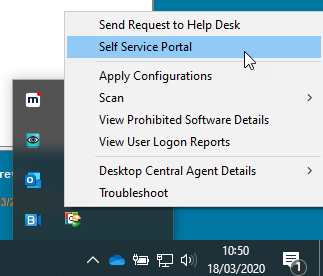
Select Self Service Portal and Left click.
After a short pause the following window will open:
After a short pause the following window will open:
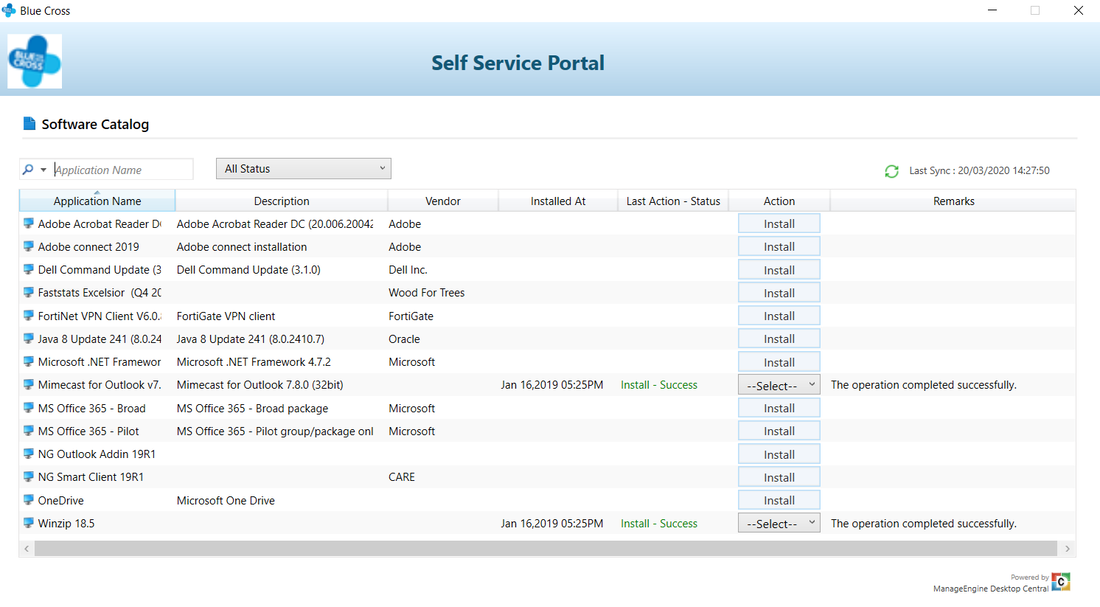
Select the install option located to the right of the Fortinet VPN Client V6.0. and Left click to install.
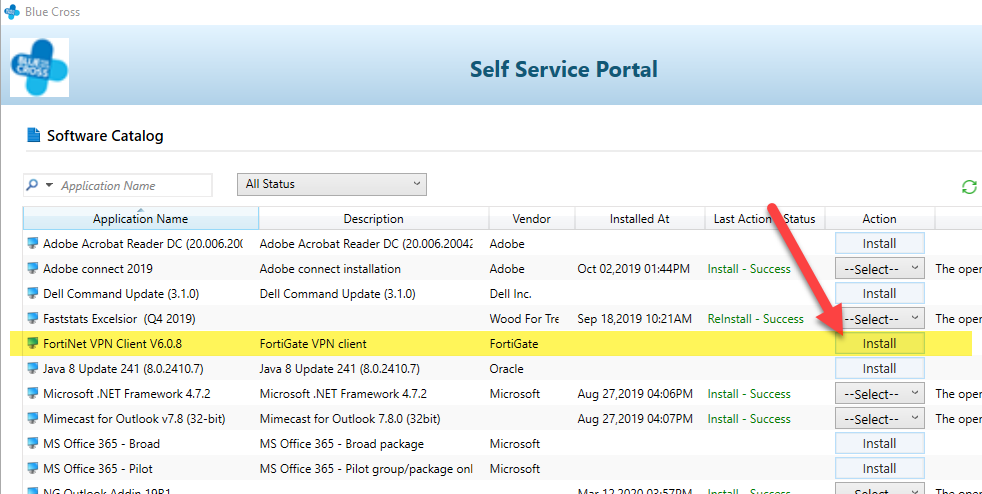
Processing and a moving green bar will appear.
Once the installation has completed, close the self-service portal window you will see on your desk top a new icon called Fortigate Client, as shown below.
Once the installation has completed, close the self-service portal window you will see on your desk top a new icon called Fortigate Client, as shown below.

To connect back to the Blue Cross resources, double Left click on the Fortigate Icon. The following window will launch.
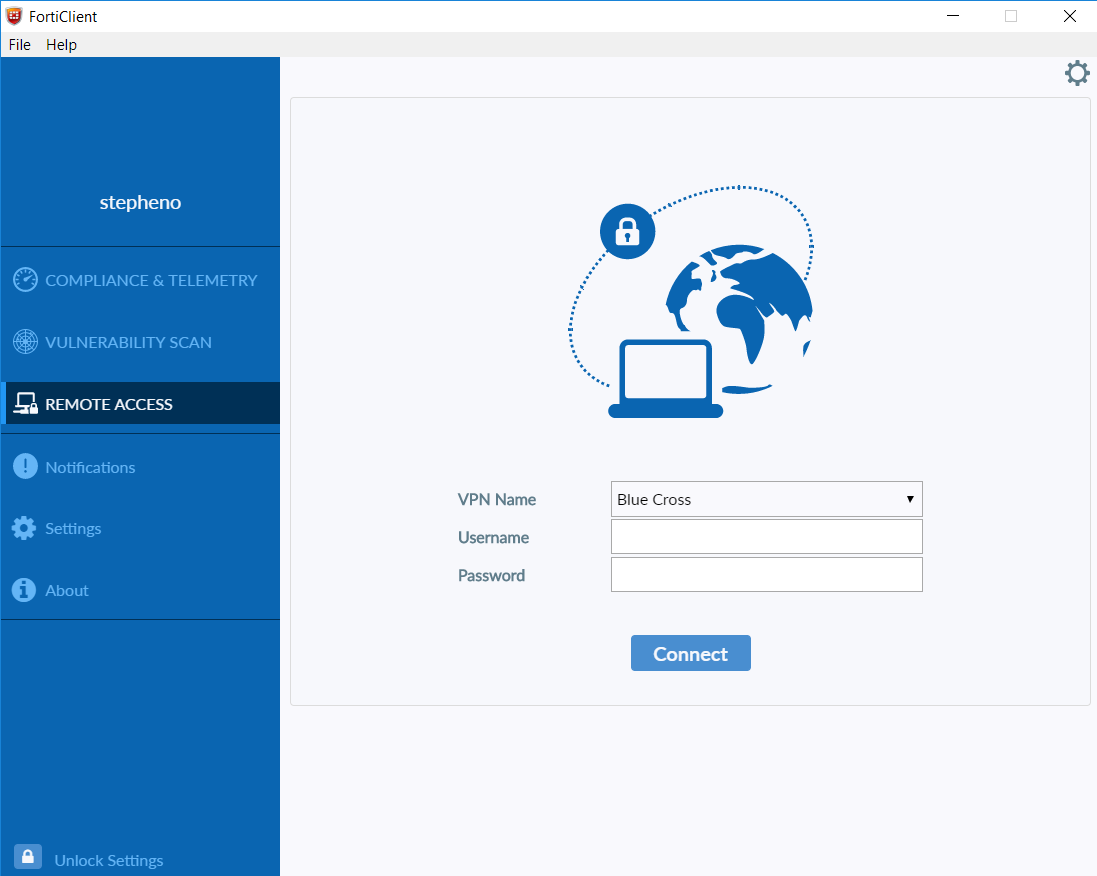
Left click once on remote access.
Enter your Windows username e.g. pcross
Enter your Windows Password: e.g. bluebannanas#10
The client will then run through a counter from 0% too 100%, once 100% in reached the client will auto close and you should be able to access network drive resource via your computer.
To access shared resources, click on the drives as you would normally use them when in the office.
Please note that the speed of connection via the VPN client will be dependant on the speed of your home broad band.
Should you have any difficulties installing the Fortigate client, please call the Blue Cross service desk on 0300 790 9906.
We will be operating telephone support as normal during the period of home working.